Wedding Photography 101 by NSW Wedding Photographer Antony Hands
Lesson 2 - Basic photographic knowledge required
The first question that I suggested you ask yourself in lesson one was "Consider if you are competent enough to confidently photograph the wedding". I was referring to the differences between wedding photography and general photography, and how even competent photographers may need time to learn a new type of photography. This lesson is not about that.
This lesson is about basic photographic skills that must be understood to get the best from your photography, and that are vital to any professional photographer, or anyone thinking of doing a job such as a wedding.
In today's world of "green box mode" and auto everything many amateur photographers take photos for years and years without understanding the basics of photography. Their photos normally look great, because the cameras today are getting better and better at assessing exposure, but they often get photos that are under or overexposed, and they don't understand why. This lesson covers the basics, but also the higher level skills that you need to be confident with to get great wedding photography results.
1. 18% gray and the way your camera meters light
This is probably the most important lesson that anyone can learn who relies on the meter in their camera to assess exposure (ie. 99% of us). The meter inside your camera is a "reflected light" meter - it measures the amount of light reflected from something. The problem arises because when light falls on different subjects, different amounts of light will be reflected. This can lead to your camera meter being fooled.
When camera meters were first developed, manufacturers settled on a standard, commonly known as 18% gray, to be the average meter reading. What this means is that after analysing many photos, they decided that a meter reading that would expose 18% gray perfectly under the current light levels would expose most subjects correctly. Basically, the camera is designed to assume that everything is middle gray, and in most circumstances this works ok. The problem is when subjects are significantly lighter or darker than 18% gray.
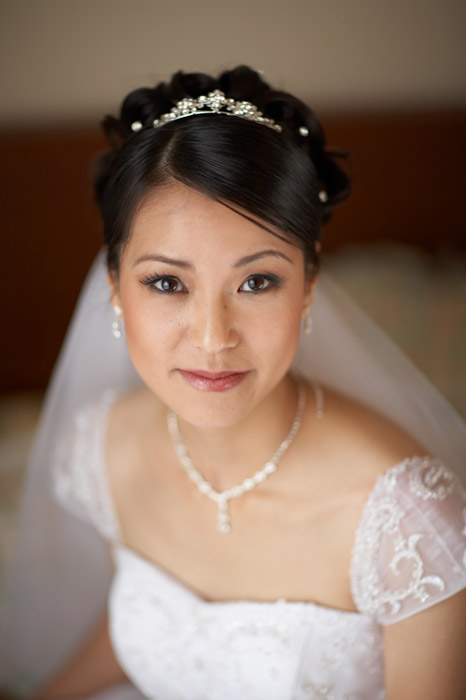
A white subject that fills the frame, like a bride for example, is going to reflect much more light than a black subject such as a groom. Your camera doesn't realise that there is actually a difference in subject brightness - it assumes the light has changed, rather than the subject has changed. As a result it will underexpose the photograph of the bride, making the dress a muddy gray. In the case of the groom it will overexpose the photo, adding extra light to make the black suit gray, and resulting in the face being washed out. Both photos will require work to be able to be used, and both will be worse photos than if they were correctly exposed in the first place.
You can test this by taking a photo of a white and black wall. Both will come out gray - perhaps not exactly the same, but still not black and white. You need to use the exposure compensation feature of your camera to adjust the exposure to make sure the shots are accurate.
Being able to easily determine when you need to use exposure compensation (EC) is a key part of being a wedding photographer. With subjects changing rapidly, you must be able to quickly and easily change the EC, and remember to change it back later or risk losing images. The use of the histogram display makes this much easier for photographers nowdays, but still on the day it is entirely too easy to either forget to change it at all, or get so focused on your technical stuff that you miss the key details of the wedding. You need to be very confident with adjusting your EC on the fly before you shoot your first wedding if you want to get the best possible results.
For
more information on this subject there is a great book which is actually
designed to teach the use of a hand held ambient meter (which is a whole
other story, and great for studio work etc.). The book is called "The
Hand Exposure Meter Book", by Martin Silverman, Jim Zuckerman and
Bob Shell. It's pretty expensive (I just checked and on Amazon it was
$69.95) but it is very good at teaching the basics. I am sure there will
be other books out there, just look around. Alternatively, if you want
to there is plenty of info online that will help you get an understanding
of this key subject. A good reference from Kodak is here.

2. The relationship between aperture and shutter speed
I won't even go into this, suffice it to say that if you don't understand the relationship between aperture and shutter speed you should not photograph the wedding under any circumstances. If this is the case, have a read of some of these links.
Naturally, this is all pretty basic stuff. I am sure you will be past this level!
3. Apertures to use at a wedding, and how aperture affects depth of field
As you probably are aware, aperture and focal length both affect depth of field, or how much of the photograph will be in focus. Small apertures and wider focal lengths create greater depth of field and wide apertures and longer focal lengths reduce the depth of field. If you are unfamiliar with exactly how this works, have a look here.
What the wedding photographer
needs to understand is when to use wider apertures to achieve their desired
effects, and when smaller apertures are needed. Basically, wider apertures
are used to achieve separation from the background, to focus attention
on the subject or for artistic reasons. Here is an example of where a
shallow depth of field has been used intentionally for artistic effect:
Using shallow depth of field is great, but sometimes you can go overboard. You need to be very familiar with how the subject will look at certain apertures - this comes from practice. Do not expect the view in the viewfinder to be an accurate reflection of depth of field. The LCD is better, but still too small to accurately assess critical focus.
That said, here a re a few rules of thumb that you can use as the basis for your practice before the wedding. Make sure that you have done this practice to make sure you get the results you expect. After all, different sensor sizes also affect depth of field, and what works for me may not work for you.
- For bridal portraiture (head and shoulders) use an aperture of not less than f/2 unless you are very familiar with your tools. Even at f/2 the whole face will not be in focus. If you want to be sure you nail focus on the whole face an aperture of between f/2.8 and f/4 is probably best. Naturally you are using a telephoto lens to get the most flattering perspective.
- For the groom's head and shoulders shot use a smaller aperture, say f/4. The "dreamy" look that wider apertures give generally does not suit men, as it implies femininity rather than masculinity.
- For couple shots you really need to be above f/4 unless you can get their faces very close together. It is very disappointing to get a great shot where one person is in focus and the other is just out of focus. You won't see this on the LCD - you need to anticipate it, and select a smaller aperture to increase your depth of field.
- For family formals the minimum aperture should be f/5.6. This should ensure that everyone is in focus.
- For group photos, say of the entire congregation outside the church you need a wide angle, and preferably shoot at f/11.
4. The importance of fill flash
The use of fill flash is important for weddings in so many ways. For normal portraiture in the shade it can be used to gently fill in eye sockets, making shots more flattering. In bright sun it can be used to overpower the daylight, removing harsh shadows. The difference between the two applications is the amount of flash exposure compensation (FEC) applied. Overall, it is a very difficult thing to master, and something that MUST be practiced. As well as that, the way fill flash works differs from manufacturer to manufacturer. While you need to work out how your camera uses fill flash, here are a few suggestions that work for me using Canon digital gear.
- For fill flash in normal shaded light, use -1.5 to -2 FEC. Remember, at 0 FEC the camera is trying to balance natural light with flash. This is a lot more flash than is required to add a touch of fill.
- In bright sunlight when you are trying to eliminate harsh shadows from faces etc, you may need to use as much as +1 FEC, using the flash to overpower the sunlight.
This is much more art than science. Thankfully you can get a good idea of fill flash by using the LCD screen on the camera. That said, you need to practice this a lot so you can confidently use fill in all light.
5. Use of flash in general
When shooting a wedding you will be constantly moving from environment to environment. You need to be able to quickly change your flash settings to deal with these changes. Most photographers do not use flash regularly, and so they are unaware of what you can and can't do with flash, and how your camera is programmed to act on different settings and in different environments. I could go on for hours about the way the Canon system measures flash and controls flash exposure, but instead if you are a Canon user I recommend you visit here and have a good (long) read.
To get good results it is more than just setting your camera to "green box" and shooting away. That is a recipe for overexposed subjects in front of inky dark backgrounds. You need to make the best use of ISO, aperture and shutter speed merged with flash to help get some ambiance and a taste of what the venue was like. After all, no-one wants to get their photos looking like they were married in a coal cellar. A good photographer will understand the capacity of him or herself and their equipment, and will be able to get the best results possible with that combination.
For example, understanding the way that the Canon flash system works, when I am relying on flash I shoot with the camera in manual mode, and rely on the flash metering to expose correctly for the foreground. My settings are at a level to optimise the background, without jeapardising shutter speed that might lead to camera shake, or aperture, that might lead to areas I want in focus being outside the depth of field. As a result, when I move from in the dark church to outside I quickly need to change my mode from manual to aperture priority, my film speed from say 800 to 100, my flash exposure compensation from +0.5 FEC to -2 FEC, and then check my aperture is correct for the subject. This happens automatically and quickly, because I have done it so many times. Make sure you understand the way your camera performs best in low light and bright light, and what settings you need to adjust when moving between venues etc.
Unfortunately, I don't know the way it works with other brands - the answer is practice.
Ok, so that's about
it for the basic photographic knowledge you should have before considering
shooting a wedding. Naturally, there is a whole lot more it would be good
to know, but these things are a must if you want to be confident of delivering
great results.
About the author
Antony Hands is an experienced professional wedding photographer based in Coffs Harbour, NSW. He is the principal of Chasing Summer Photography, a studio which specialises in wedding photography and stop motion wedding films and services the surrounding districts including Tamworth, Armidale, Port Macquarie, Kempsey, Nambucca Heads, Grafton and as far North as Ballina.